Tatreez Clean Back Guide
How To Have a Clean Back With Tatreez
Achieving a clean back is a unique concept for Tatreez embroidery. A clean back refers to ensuring neat backstitches that are well-organized and free of knots.
This practice prevents thread wastage, especially with the traditional use of expensive silk threads. Excess thread can also add unnecessary weight to the fabric. Maintaining a clean back demonstrates your skill in planning cross stitches meticulously to create beautiful results on both sides. Although a clean back is considered a high achievement, it is not obligatory for Tatreez and shouldn't deter anyone from undertaking any project.
This guide features four tips for achieving a clean back with Tatreez.
Examples
Four Tips for a Neat Back
1. Plan Your Stitches
Before starting a project, take time to plan your stitching approach to avoid random jumps in your thread. Planning your stitches means knowing the entry and exit points for each stitch to ensure a smooth transition to your next stitch and a clean back. This involves considering different techniques depending on the motif and pattern.
How to Plan Stitches
Planning your stitches involves mentally mapping the order of stitches. Stitchers will choose a direction of crossing and the direction of backstitches.
As discussed in our guide "One Stitch at a Time," a cross stitch comprises four points, and the sequence of entering these points determines whether the resulting backstitch is horizontal or vertical.
Vertical Backstitch
Horizontal Backstitch
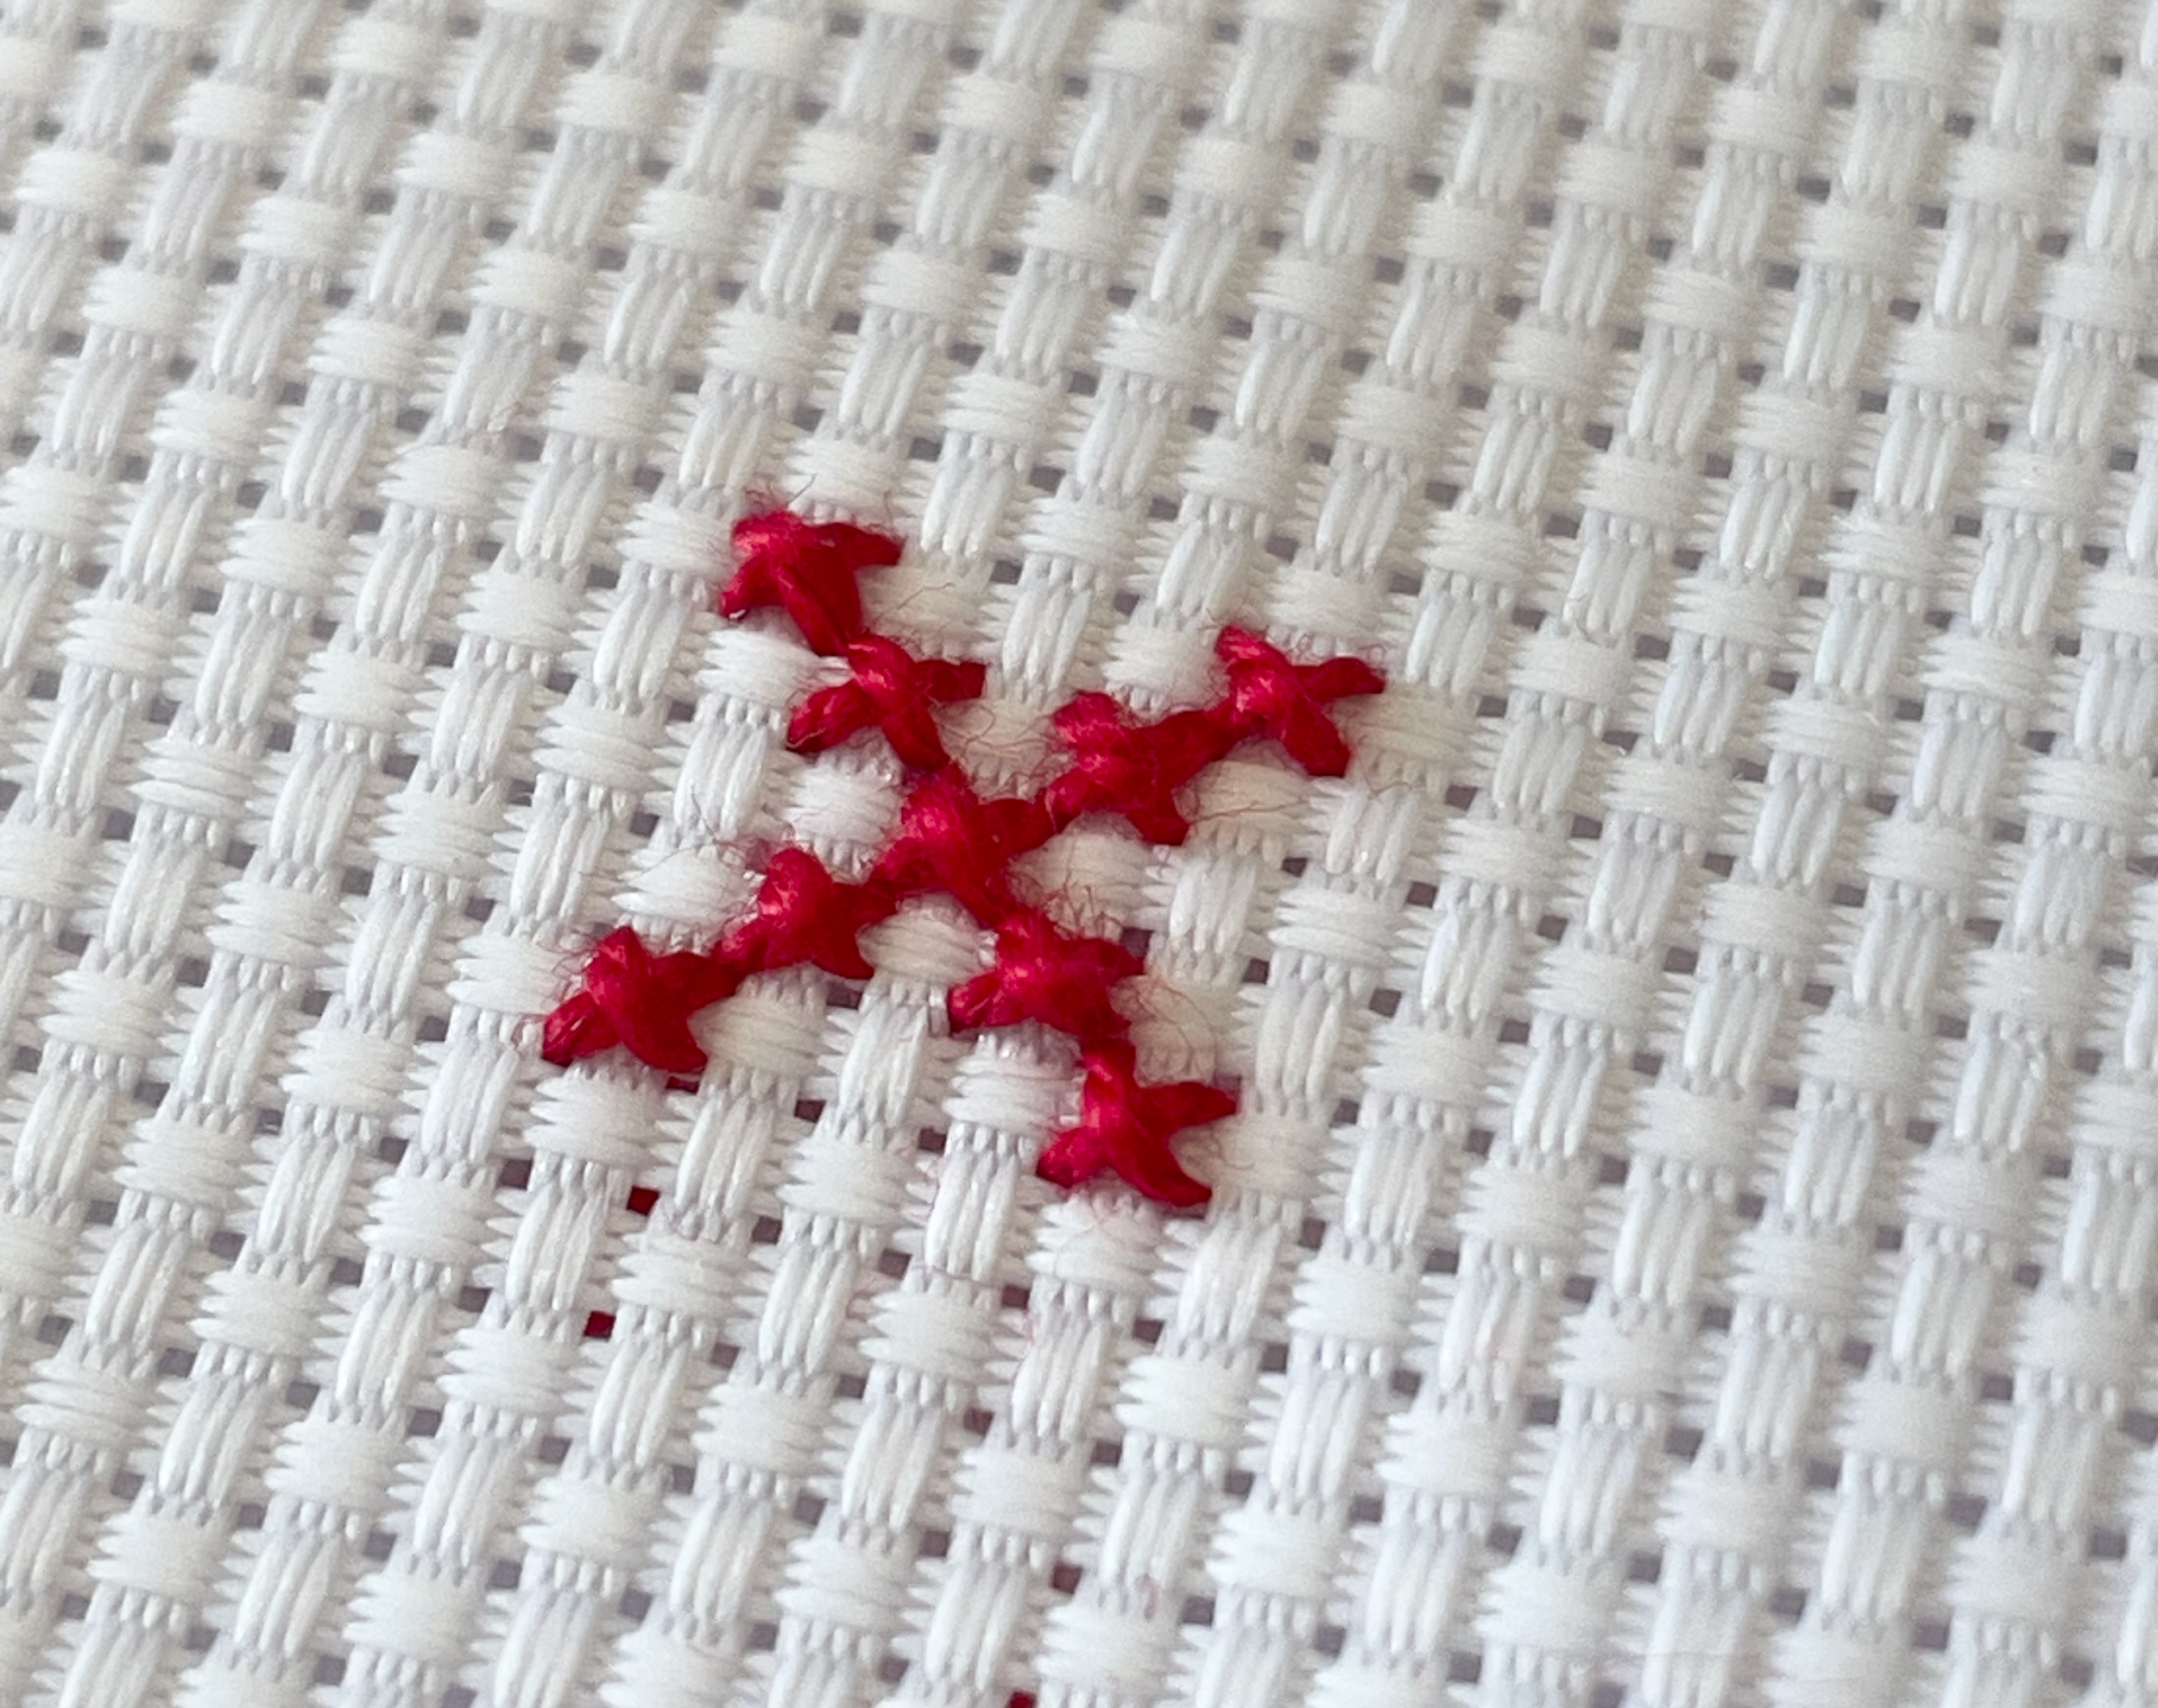
There is no correct direction for backstitching, and some motifs and patterns allow for a combination of both directions. However, diagonal back stitches are avoided by some stitchers, as they create crosses in the back, disrupting the organization of horizontal and vertical stitches.

In this example, diagonal stitches created a cross in the back. This creates a disorganized appearance in proximity to vertical and horizontal backstitchesDifferent stitchers have personal preferences for achieving a clean back, resulting in variations in the approach for the same motifs. Some prioritize maintaining completely parallel backstitches (all horizontal or all vertical). At the same time, other stitchers focus on ensuring cross stitches in the front cross in the same direction, incorporating a mix of horizontal and vertical back stitches.

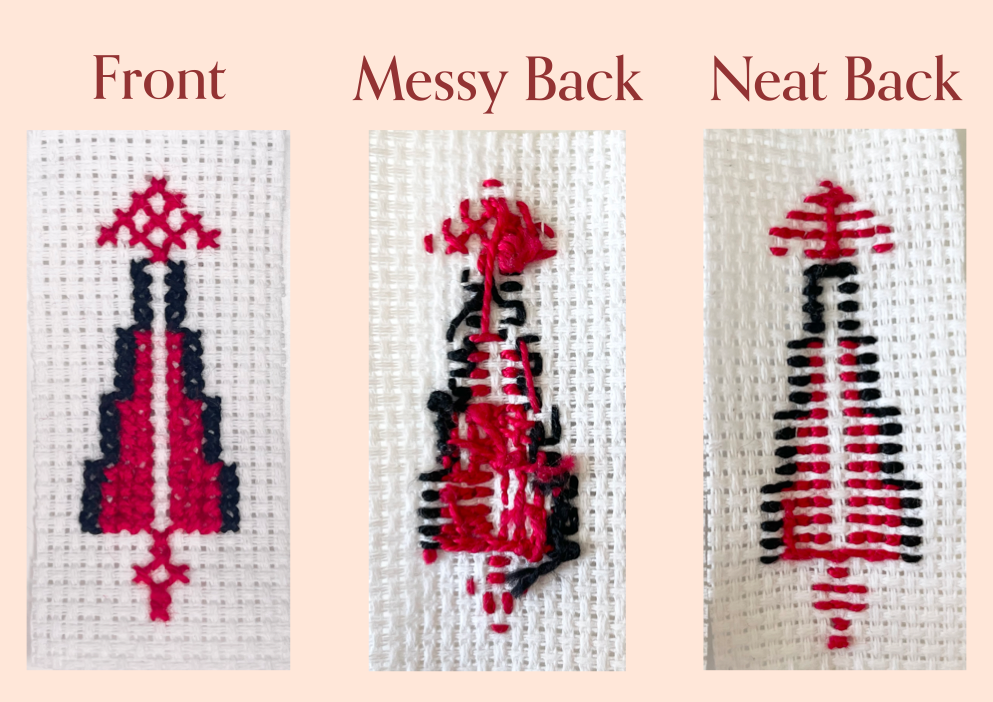
Stitching Variations & Their Outcomes
Below are three variations, each demonstrating a different approach to completing a simple triangle with neat backstitching. This illustrates the numerous methods available to achieve a clean back, emphasizing that no definitive solution exists. Ultimately, the choice comes down to personal preference.
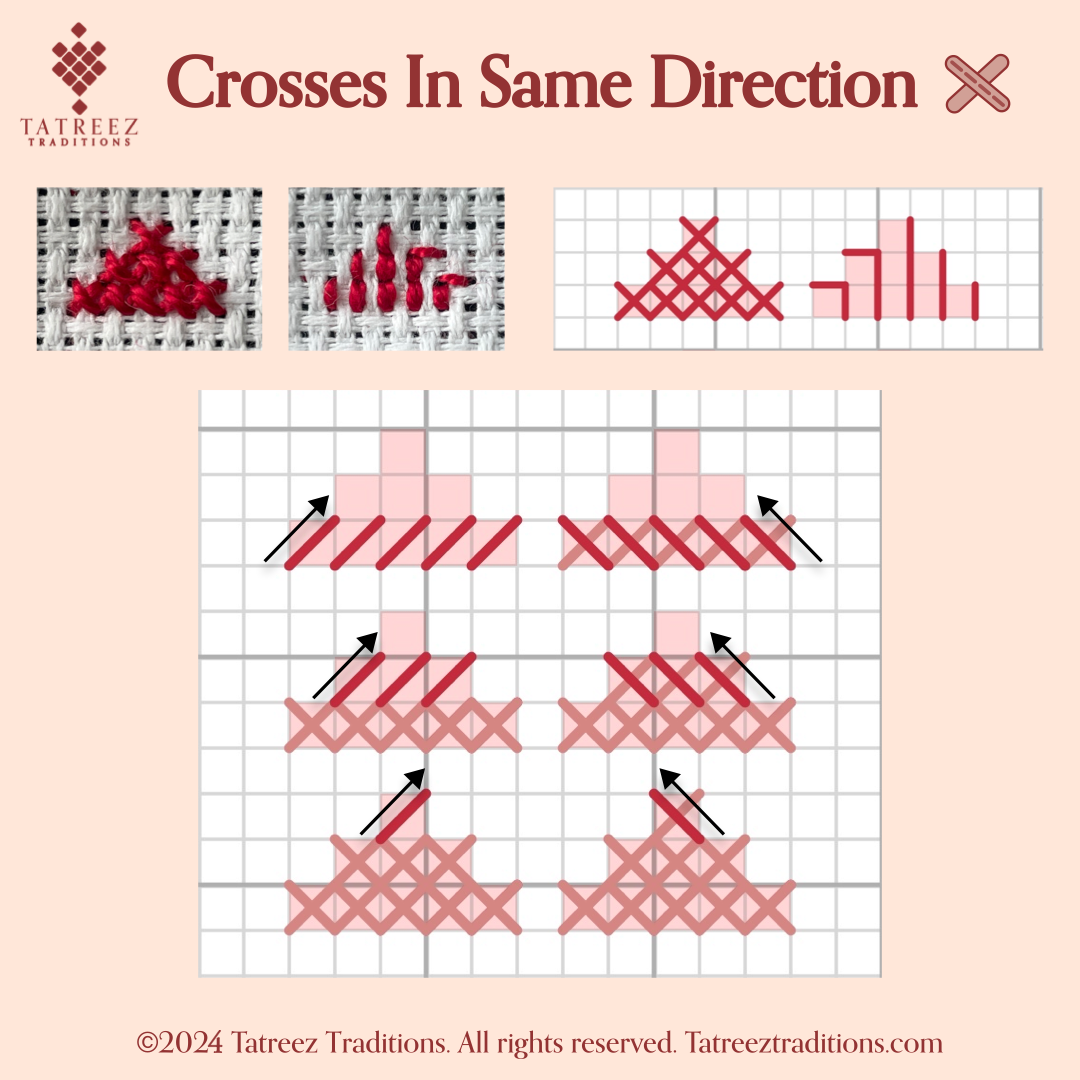


In the first example, neat backstitching is exhibited with all front cross stitches crossing in the same direction.
The second example demonstrates horizontal backstitching with the front cross stitches arranged in various directions.
Lastly, the third example showcases vertical backstitching, with the front cross stitches also arranged in various directions.
2. Avoid Knots
Starting your stitches with a bulky knot to anchor your thread can result in a messy back. A knot that protrudes from the backside will disrupt the smoothness of your stitches, leading to a tangled appearance. As you continue stitching, these protruding knots can catch on your needle, creating accidental knots and further cluttering the back of your work.
Visit our Alternative Starting Techniques post for step-by-step instructions on creating a Tuck Start, Loop Start, and Pin Start.
How to Create a Tuck Start
A Tuck Start is a popular alternative to starting with a knot. It can be used with both embroidery floss and pearl cotton thread. It involves securely tucking the beginning of your thread with your very first cross stitches. Refer to the instructions below.


Video Demonstration
How to Create a Tuck Start (Knotless Start)
Thread your needle and insert it into your aida cloth or waste canvas from the back. As you insert the needle, ensure that you pull it through the canvas but leave approximately 1-2 cm of thread at the back. Maintain a firm grip on this excess thread at the back, preventing it from pulling through entirely.
Continue holding the thread, and start to make half-stitches. Ensure that the excess thread is overlapped with your next move. This overlapping action ensures that the thread is secured by the cross stitch itself, allowing you to let go.
Once you have reached your desired half stitches, complete them by stitching backward. Ensure that you overlap the excess thread once again.
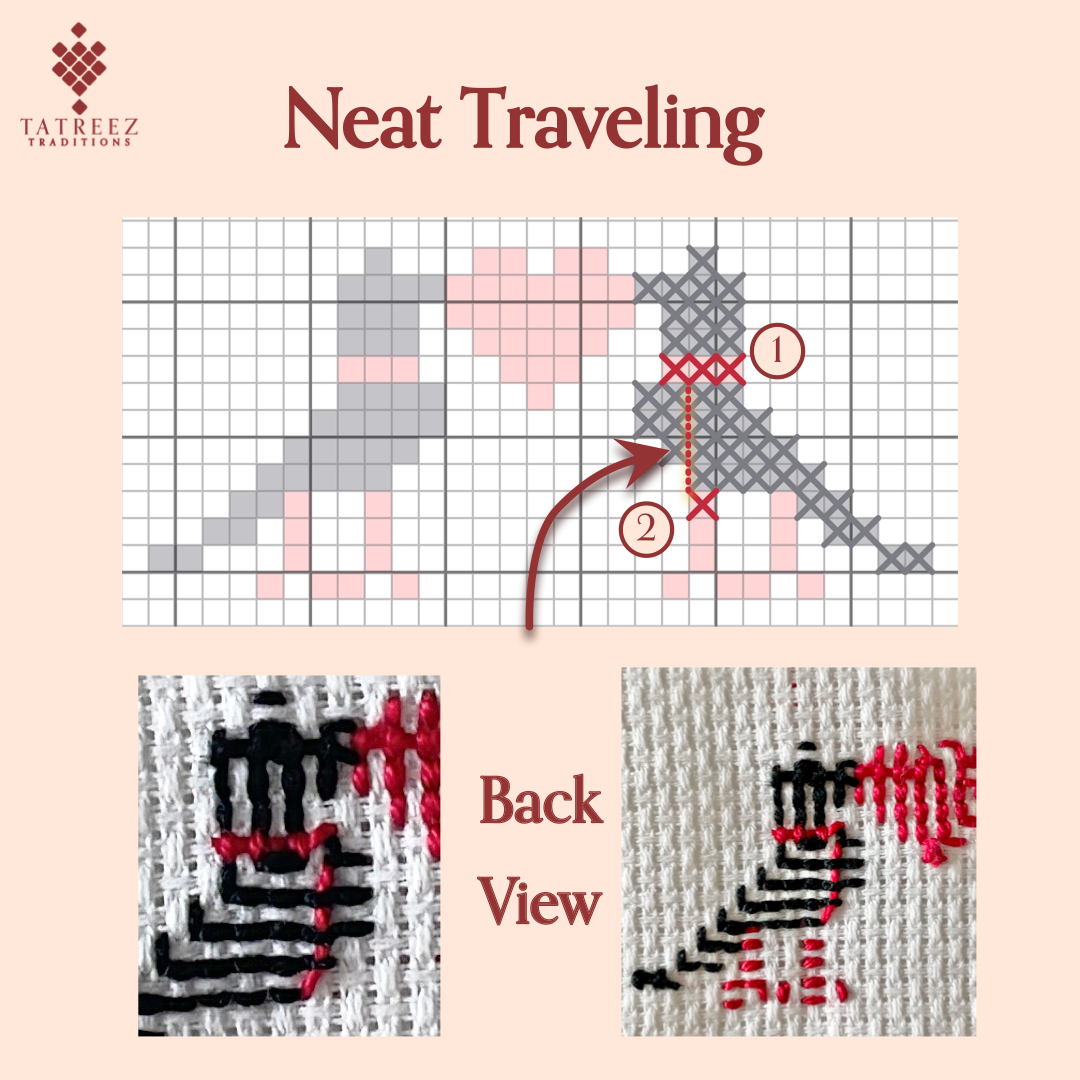
3. Travel Neatly
The technique of traveling entails carrying your thread to a new cross-stitch location. Knowing when to utilize traveling and when it's preferable to start a new thread is important.
An important element of traveling and maintaining a neat back is tucking your thread neatly under existing stitches between the two points. This action secures the thread, preventing subsequent stitches from snagging on loose threads, causing additional knots and further clutter on the back of your work.

How to Travel Between Stitches
To maintain a neat back, it's advisable to travel only when the next point is a few stitches away. When traveling, tuck the thread under existing stitches; leaving it long and untucked between points is incorrect. If the new point is significantly distant without any stitches in between to tuck under, it's best to use a new thread to avoid leaving the thread loose.

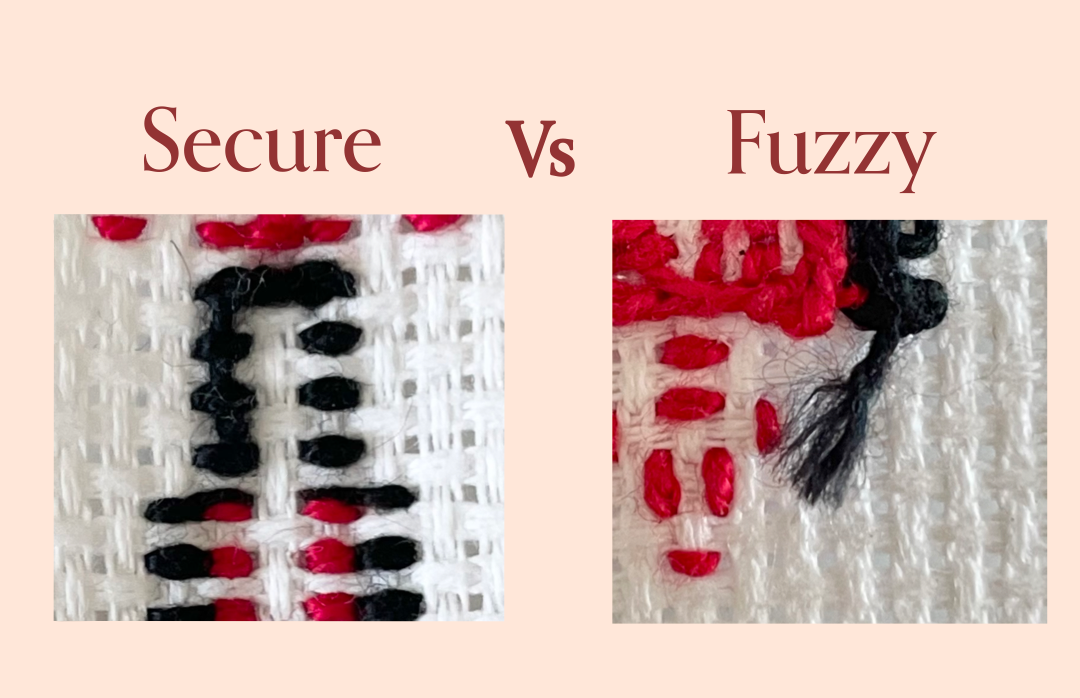
4. Do Not Create Fuzzy Ends
When securing your stitches using a Tuck start or end, cut the thread as close to the tucked point as possible. When the thread is left hanging beyond the tucked point, it will begin to fuzz as you continue stitching. This fuzziness may result in additional knots or even unraveling if it gets snagged on something.
Below is an example of the fuzzing that may happen.
How to Create a Tuck Finish
Video Demonstration
How to Create a Tuck Finish (Knotless Finish)
Your needle is positioned at the back when you finish your stitch.
Insert the needle through the back of multiple cross stitches.
Cut thread from the needle, close to other stitches.
Key Takeaways
A clean back in Tatreez embroidery displays precision and skill. Maintaining a neat back ensures efficient thread usage, prevents unnecessary weight on the fabric, and showcases your planning in cross-stitching. While it's not obligatory, striving for a clean back enhances the overall quality of the work. This guide has addressed key issues contributing to a messy back and provided techniques to ensure future projects maintain a tidy appearance. By mastering these techniques, embroiderers can elevate their craft and create beautiful Tatreez pieces with confidence.
Bonus: Start applying your skills today!

Download our free step-by-step stitching instructions for the Cypress Tree Motif. These steps feature neat horizontal back stitches.